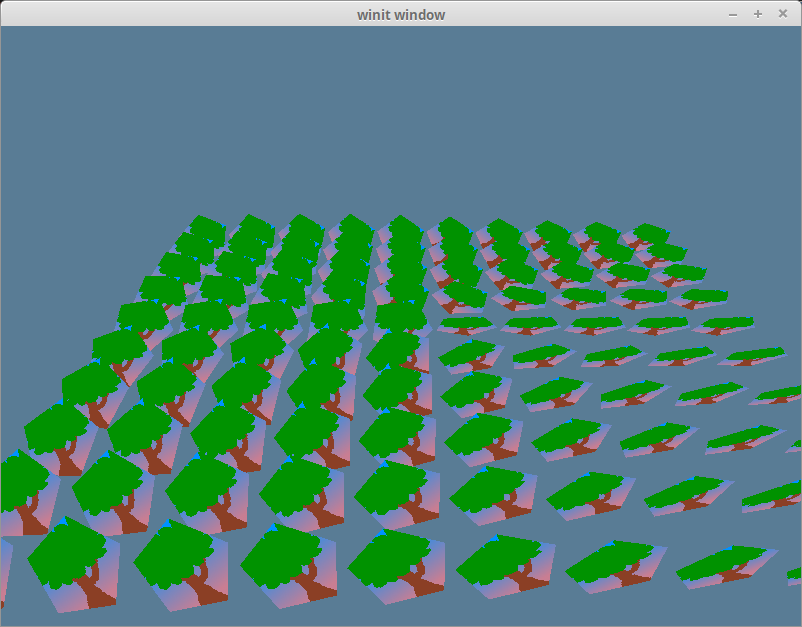
Let’s take a closer look at the last example.
让我们仔细看看最后一个例子。

Models that should be in the back are getting rendered ahead of ones that should be in the front. This is caused by the draw order. By default, pixel data from a new object will replace old pixel data.
应该在后面的模型将在应该在前面的模型之前进行渲染。这是由提取顺序引起的。默认情况下,来自新对象的像素数据将替换旧像素数据。
There are two ways to solve this: sort the data from back to front, use what’s known as a depth buffer.
有两种方法可以解决这个问题:从后到前对数据进行排序,使用深度缓冲区。
Sorting from back to front
This is the go to method for 2d rendering as it’s pretty easier to know what’s supposed to go in front of what. You can just use the z order. In 3d rendering it gets a little more tricky because the order of the objects changes based on the camera angle.
这是2d渲染的方法,因为它很容易知道在什么之前应该做什么。你可以使用z顺序。在3d渲染中,由于对象的顺序会根据摄影机角度发生变化,因此会变得有点棘手。
A simple way of doing this is to sort all the objects by their distance to the cameras position. There are flaws with this method though as when a large object is behind a small object, parts of the large object that should be in front of the small object will be rendered behind. We’ll also run into issues with objects that overlap themselves.
执行此操作的一种简单方法是根据对象到摄影机位置的距离对所有对象进行排序。这种方法存在缺陷,尽管当一个大对象在一个小对象后面时,应该在小对象前面的大对象部分将在后面渲染。我们还将遇到对象重叠的问题。
If want to do this properly we need to have pixel level precision. That’s where a depth buffer comes in.
如果要正确地做到这一点,我们需要有像素级的精度。这就是深度缓冲区的作用。
A pixels depth
A depth buffer is a black and white texture that stores the z-coordinate of rendered pixels. Wgpu can use this when drawing new pixels to determine whether to replace the data or keep it. This technique is called depth testing. This will fix our draw order problem without needing us to sort our objects!
深度缓冲区是存储渲染像素z坐标的黑白纹理。Wgpu可以在绘制新像素时使用此选项来确定是替换数据还是保留数据。这种技术称为深度测试。这将解决我们的绘图顺序问题,而不需要我们对对象进行排序!
Let’s make a function to create the depth texture in texture.rs.
让我们制作一个函数,在texture.rs中创建深度纹理。
1 | impl Texture { |
- We need the DEPTH_FORMAT for when we create the depth stage of the render_pipeline and creating the depth texture itself.
- Our depth texture needs to be the same size as our screen if we want things to render correctly. We can use our sc_desc to make sure that our depth texture is the same size as our swap chain images.
- Since we are rendering to this texture, we need to add the RENDER_ATTACHMENT flag to it.
- We technically don’t need a sampler for a depth texture, but our Texture struct requires it, and we need one if we ever want to sample it.
- If we do decide to render our depth texture, we need to use CompareFunction::LessEqual. This is due to how the samplerShadow and sampler2DShadow() interacts with the texture() function in GLSL.
- 当我们创建render_pipeline的depth stage和创建depth texture本身时,我们需要DEPTH_FORMAT。
- 如果我们想正确渲染,我们的深度纹理需要与屏幕大小相同。我们可以使用sc_desc确保深度纹理与swap chain图像的大小相同。
- 由于我们正在渲染此纹理,因此需要向其添加RENDER_ATTACHMENT标志。
- 从技术上讲,我们不需要深度纹理的采样器,但我们的纹理结构需要它,如果我们想对它进行采样,我们需要一个采样器。
- 如果我们决定渲染深度纹理,我们需要使用CompareFunction::LessEqual。这将决定samplerShadow和sampler2DShadow()如何与GLSL中的texture()函数交互。
We create our depth_texture in State::new().
我们在State::new()中创建深度纹理。
1 | let depth_texture = texture::Texture::create_depth_texture(&device, &sc_desc, "depth_texture"); |
We need to modify our render_pipeline to allow depth testing.
我们需要修改渲染管线以允许深度测试。
1 | let render_pipeline = device.create_render_pipeline(&wgpu::RenderPipelineDescriptor { |
The depth_compare function tells us when to discard a new pixel. Using LESS means pixels will be drawn front to back. Here are all the values you can use.
深度比较功能告诉我们何时丢弃新像素。使用LESS的方法将前后绘制像素。以下是您可以使用的所有值。
1 |
|
There’s another type of buffer called a stencil buffer. It’s common practice to store the stencil buffer and depth buffer in the same texture. This fields control values for stencil testing. Since we aren’t using a stencil buffer, we’ll use default values. We’ll cover stencil buffers later.
还有另一种类型的缓冲区称为stencil缓冲区。通常的做法是将stencil缓冲区和深度缓冲区存储在同一纹理中。此字段控制stencil测试的值。因为我们不使用stencil缓冲区,所以我们将使用默认值。稍后我们将讨论stencil缓冲区。
Don’t forget to store the depth_texture in State.
1 | Self { |
We need to remember to change the resize() method to create a new depth_texture and depth_texture_view.
我们需要记住更改resize()方法以创建新的depth_texture和depth_texture_view。
Make sure you update the depth_texture after you update sc_desc. If you don’t, your program will crash as the depth_texture will be a different size than the swap_chain texture.
请确保在更新sc_desc后更新depth_texture。如果不更新,程序将崩溃,因为depth_texture的大小将不同于swap_chain texture。
The last change we need to make is in the render() function. We’ve created the depth_texture, but we’re not currently using it. We use it by attaching it to the depth_stencil_attachment of a render pass.
我们需要做的最后一个更改是在render()函数中。我们已经创建了depth_texture,但目前没有使用它。我们通过将其附加到渲染过程的depth_stencil_attachment来使用它。
1 | let mut render_pass = encoder.begin_render_pass(&wgpu::RenderPassDescriptor { |
And that’s all we have to do! No shader code needed! If you run the application, the depth issues will be fixed.
这就是我们要做的!不需要着色器代码!如果运行应用程序,深度问题将得到修复。

Challenge
Since the depth buffer is a texture, we can sample it in the shader. Because it’s a depth texture, we’ll have to use the samplerShadow uniform type and the sampler2DShadow function instead of sampler, and sampler2D respectively. Create a bind group for the depth texture (or reuse an existing one), and render it to the screen.
由于深度缓冲区是一个纹理,我们可以在着色器中对其进行采样。因为它是一个深度纹理,所以我们必须分别使用samplerShadow uniform类型和sampler2DShadow函数,而不是sampler和sampler2D。为深度纹理创建bind group(或重用现有组),并将其渲染到屏幕上。